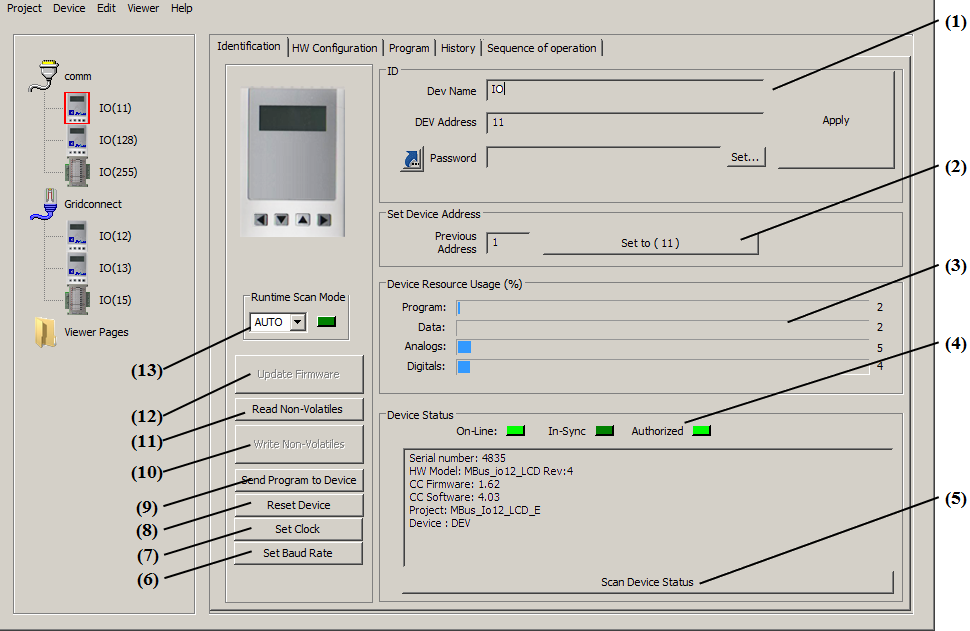
The Identification tab provides an overview of the device. From this tab you can define the name and address of the device on the network. You can also perform some of the maintenance activities. If you change the device name or address, press the "Apply" button to apply the change to the project. The "Device Resource usage" section shows the amount of the device's resources required to run the currently defined MBus_ioFlash program, the numbers on the right of the bar graphs are in (%) of available space.
Figure 1.
| (1) | Device's identification. Includes it's name
and the RS485 network address. Also allows for setting a device password,
see Password Protected Projects (PRO
Only) for details. Note that the Password parameter can use the ( |
| (2) | This button can be used to change a device's address. Enter the new address you want to set the device to in the "DEV Address" field and press APPLY. Then enter the device's current address in the "Previous Address" filed. Then press the "Set to (__) " button. This send the necessary commands to the device to change it's address. If you don't know the device's current address you can use the special universal address 254 in the "Previous Address" filed. This will work regardless of a device's currently set address because a MBus_ioFlash device will always respond to 254 as if it was its own address. Use 254 with caution, you cannot use 254 if the device is not alone on the RS485 network. |
| (3) | This area shows the amount of resources used/available for the current program. |
| (4) | Indicators of the device status, will show if the device is physically connected, if the program the device is running is in sync with the current project and the authorization status of the device. This information is refreshed when the Scan Device Status is pushed. |
| (5) | This button will scan the device for its status information. The information will be displayed in the text box above the button. |
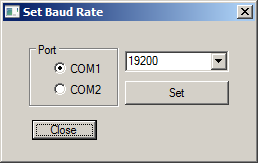
| (6) |
The Set Baud Rate button (MBus_io12_LCD & MBus_io14_DIN only!) allows
the device BAUD rate to be set to any of the following rates (9600, 19200,
38400, 57600, or 115200).The button opens a dialog as shown, where desired
BAUD rate can be selected from a list. Push "Set" to apply. The MBus_io14_DIN has
two independent communication ports, so there is a selection provided to
indicate which port's BAUD rate you want to set. Note that after you press
"Set", the new BAUD rate will be programmed and the device will reset so
that it can reinitialize to the new BAUD rate setting. The BAUD rate
setting is written to non-volatile memory, it will be retained across
power cycles. Note also that you will need to change MBus_ioFlash's
communication BAUD rate to match if you want to continue to access the
device with MBus_ioFlash. MBus_ioFlash's communication BAUD rate can be
adjusted from the COMM Configuration page, see
Parameters of a Communication Node. If you need to re-flash a device's
firmware you will first need to set the BAUD rate back to 19200. The
bootstrap program (ISP) only operates at 19200.
|
| (7) | For devices with an on-board RTC (Real Time Clock), this button is used to set
the clock's time and date. A pop-up window will let you read the
computer's
time, the device's clock, or to update (Write) to the device's clock.
Also, time can be set manually.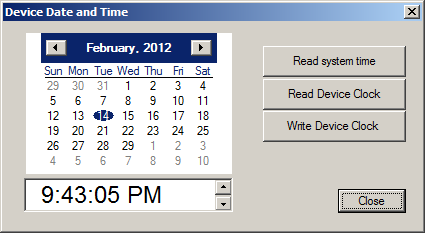 |
| (8) | The Reset Device button sends a reset command to the device. |
| (9) | The Send Program to Device button will send to the device the currently defined configuration and program. |
| (10) | The Write Non-Volatiles button will write previously saved nonvolatile parameter values to the device. |
| (11) | The Read Non-Volatiles button will read and save the nonvolatile parameter values from the device. Nonvolatile parameters are those parameters that are save internally on the device's nonvolatile memory. Examples are AV, DV, CTR type blocks. Also, value of TXT and FX blocks is considered Nonvolatile. Even if the device is re-powered these values are retained. However if the MBus_ioFlash program is changed or the Device's firmware is updated these internal values will be reset. This feature allows you to preserve them. Read them before the update and then Write them back after. The parameter's name is used to know what parameter to write. |
| (12) | Update Firmware: feature not available yet, will be part of a future release. Will replace the ccISP utility. |
| (13) | The
Runtime Scan Mode pull-down menu sets the scan mode for the device,
with three options available: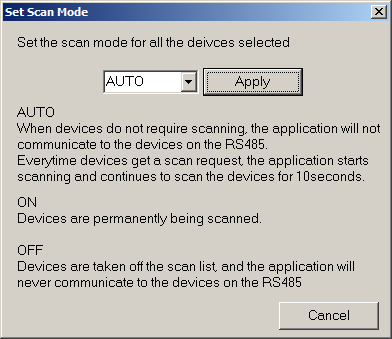 |